Well if you have read my other post on making an image gallery (example here) you will know that I used the module called ‘ImageCache’ and not the module called ‘Image’.
The reason I did this was because I read a tutorial on that and I just did what it said. I saw the image gallery that had been created and I wanted mine to look like that.
At the time I didn’t realise how easy it would be to make a gallery that still looked like that but with the image module, which already has galleries built in that use taxonomy and are just really easy to use and great! And most importantly they already have the node set up called ‘image’ so its one less thing to do. Always good.
So…. I have just set up 4 different galleries using the image module and lightbox2 and views. Take a look at them here and then read below for how I did it…
You will need the image module and the views module.
1 – Choose Gallery Names (Which will become taxonomy terms)
These names are important as they will appear at the top of the gallery and in any links to the gallery. These names are actually part of the taxonomy.
Now if you don’t know what taxonomy is then I will try to explain. Its just like a way of classifying things. So you make a ‘vocabulary’ which is a set of words or phrases, that is used to classify a certain set of things. So in the example of my 4 image galleries. I have a vocabulary for ‘image galleries’ and I have got 4 ‘terms’ which are also the titles of the image galleries. This can be viewed at admin/content/taxonomy but was actually created at admin/content/image just by adding Gallery Names. SIMPLE
2 – Upload Images – tagging each as one of the taxonomy terms
Upload the images in the usual way – node/add/image, and choose the taxonomy term in the pull down menu (that will appear because you have created the terms by naming the image galleries) Now you have the basis of your image galleries right there already because the images will have sorted themselves into the correct gallery.
3 – Customise your Galleries Using the ‘Views’ Module
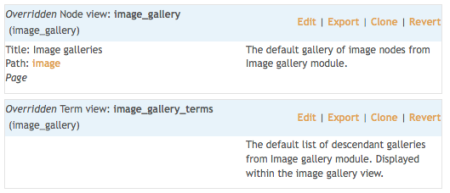
If you want the image galleries to use Lightbox 2 then all you have to do is to configure the views. Here is a screenshot to show the two views that you will have to modify. The top one is for the galleries themselves and the bottom one is for the base gallery page (which links to all the galleries). These are created by the image module, so once again – SIMPLE
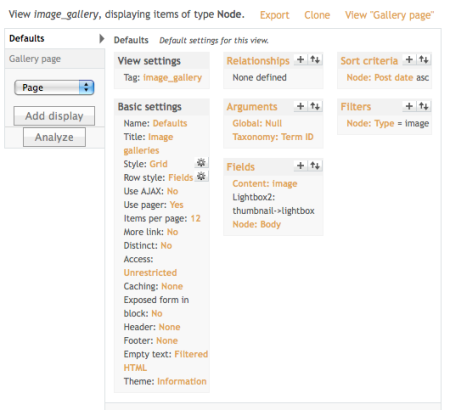
And now here are two screenshots to show how these should be configured to get the galleries to have thumbnails and then lightbox when the images are clicked on.
 This is for the image galleries, as you can see the important bit is ‘fields’ (where we enter thumbnail to lightbox – (ignore ‘node: body’ as I just used this so I could also display text with my images) and ‘arguments’ (where we enter taxonomy: term ID)
I have my galleries in a grid style with three columns, sorted by date.
 This one is for the parent page of all the galleries and the important parts of this one are ‘Fields’ (where we add taxonomy:term) and ‘Arguments’ (where we add taxonomy: parent term) and also ‘Filters’ (where we add Taxonomy: vocabulary)
By doing this we get a page which is like the home page for the galleries.
So as you can see it really is very simple to use the image gallery module and its fully customiseable. I will do image galleries like this from now on. Mainly because I had a LOT of problems when I created a new node called image as image module creates that automatically and then I had a whole load of confusion going on when I didn’t know which node was which and neither did drupal. This way is well easier!


