Good Design Can Really Improve a Website!!

January 22, 2011

Take a lok at these screen shots of how the website has improved now that it has been ‘designed’

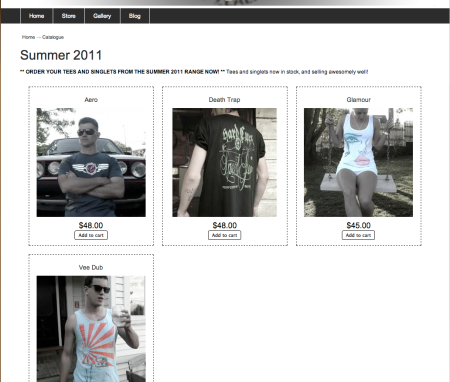
Our t-shirt designer at Hard Luck (actually also my boyfriend – he he) had a go at the website just using screen shots and having a play around with Photoshop. He came up with a new banner for the top, a new colour scheme and a fantastic new layout for the store!

I am so happy that I was able to use my knowledge of drupal to get the results that he wanted – it looks so pro now 🙂

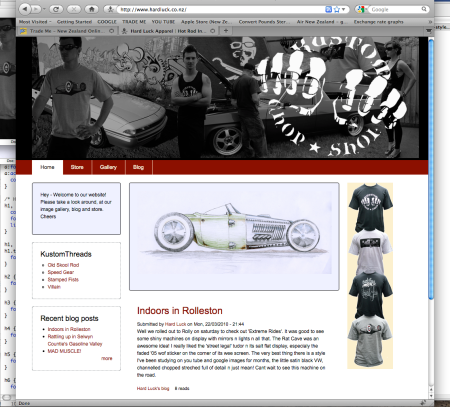
Home Page before and after – Brilliant!!


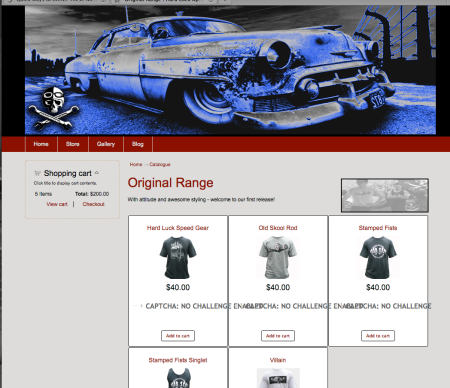
Before and after shots of the store too. Admittedly a lot of it is done with adding good photos but still it has reminded me how important it is to have a professional looking website. And given me the courage to go on and do more! I am soooo happy that I created the site all myself and its looking and working so good now!

Fantastic results and really inspired to do more!!

Two shipping quotes – Free for domestic and Flat rate for international

January 22, 2011

So what I was trying to do was to get 2 shipping prices for the t-shirts. Basically I want to make shipping within New Zealand free and I want to charge a flat rate of $12 to all orders to the UK.

Now I was not really aware of how the shipping quotes actually work when I first tried to do this and I got myself in a bit of a situation where I was adding a charge onto each garment ordered. So I went back to first principles and read about flat rate shipping quotes on the ubercart website.

Basically its really easy to set up the flat rate shipping options. Here are the steps –


Enable countries

admin/store/settings/countries/edit – here you can enable which countries you would like to offer shipping to. I have chosen 5 countries but I have only enabled 2 right now. These are the two which I will create shipping quotes for.

Set up the 2 shipping quotes

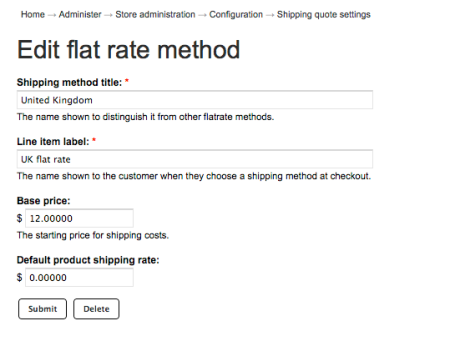
admin/store/settings/quotes/methods/flatrate/add – Add the flat rates for the 2 countries here. I have created NZ as $0 and UK as $12. Look carefully here as this is where I had my initial problem (of the shipping being multiplied by how many garments the customer bought)

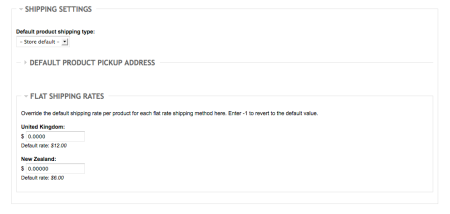
The ‘base price’ is your shipping charge and ‘Default product shipping rate’ is where you can add a rate that will get added ON TOP of the base price, for each product in the checkout. Ah ha! I had been entering my shipping price into both and then having to fix that in the individual product settings where it is possible to over-ride this setting.

So you can see here the base price of $12 and the default product rate of $0.


And here you can see where I was doin an over-ride before in product settings. I now no longer have to do this and I am able to leave this blank (rather than $0.0000) The main benefit of this is that I do not have to go into each product separately and enter this – that was such a pain!)


Adding Conditional Actions

admin/store/ca – Here we are in the store administration and in conditional actions. The shipping quote setting is a conditional action. Basically what that means is that you are able to set conditions for each shipping rate so that it is only applied when those conditions are set. For example you could have free shipping on all large orders of ten or more, or you can have, like me, free shipping to one country but not to another.

So in here we have to set up the 2 conditional actions (shipping prices) for the two countries.

First I did New Zealand, which is free. In meta data I just gave it the title ‘Shipping Quote in New Zealand’. I think its best to keep names really descriptive so that if I am away from the site for a long time I will know exactly what everything is when I come back.

Its in the conditions where the magic happens.

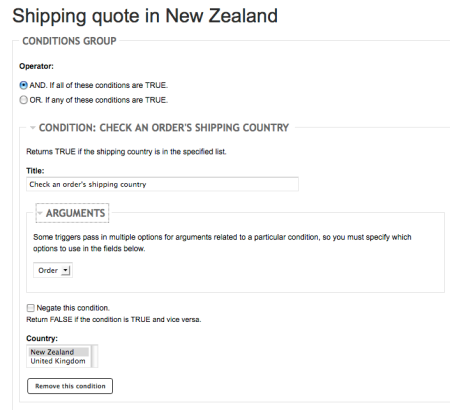
So in conditions the settings look like this –

Basically all I have done is add a condition from the drop down list called ‘Check an order’s shipping country’ and then click on New Zealand in the list of countries that pops up at the bottom. Now what will happen is that this shipping quote will be applied when the shipping country is New Zealand – yay!

I had to also do the same for UK shipping (but obviously highlight United Kingdom rather than New Zealand!)

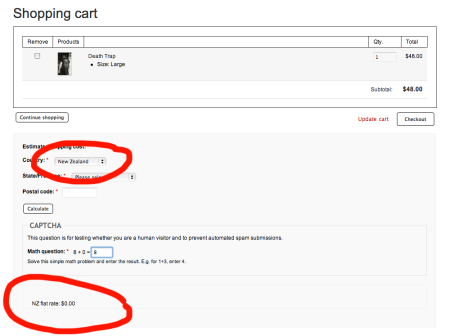
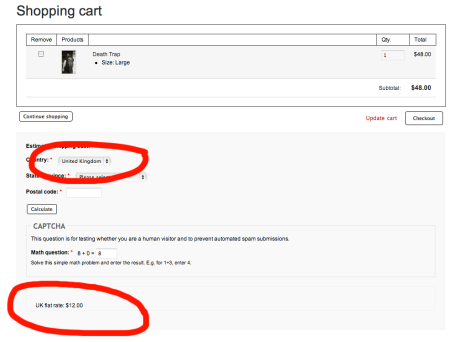
Now the shipping is “calculated” on which country is chosen at the checkout. Its only a flat rate tho so I am still not sure why they have to ask for province etc but I will fix that another day. For now it works and thats good enough for me!

Acquia-Prosper new theme made my site all grey!

March 10, 2010

OMG – I just had such a massive panic because I thought that I had lost the site appearance, all my css work. I thought it was somehow never going to work again.

I uploaded the updated acquia-prosper theme , which was fine. But the site went back to being grey colours and not all the colours I had chosen for it and spent DAYS adding into the css file. But it was ok coz I had a back up and I just uploaded the css file from before.

But then it didn’t work. Itwas still grey.

So I restarted the computer and swore at it and that didn’t work. Then I did it again and again and again and that didn’t work. And then I went into firebug for a look at it and I saw that my css file was being recognised but that it was being superseded by a new file called gray.css. So I went and had a look for this and in the updated theme there is a folder called design packs where there is a css file for gray and one for blue. And these are above the css file for the general theme.

I’m not going to use these as I have the look of my site all sorted so I just deleted the whole folder from my site. And now everything looks as it should do again – PHEW!

Internet Explorer doesn’t recognise page width

March 6, 2010

Oh by the way – just in case you were wondering – YES I am now building my parents website!!!  Thats what the image galleries are for.

Wheeeeee! I am sooooo pleased with it.

The only thing that is still bothering me is that I have created it all on a Mac and I have not really thoroughly tested it on Internet Explorer so I am not sure exactly how it works.

I do know that there is a problem with the page width. What I want is for the page width to be fixed at 800 pixels wide. I decided that this would be the best option for viewing as I would like to keep lines of text short enough to be interesting and readable.

To fix the page width I changed a line in the layout.css file so that it now reads

But the problem is that Internet Explorer doesn’t seem to recognise this. Well I have only tested it on IE6 and it definitely didn’t work on that   😦

I have read up quite a bit about it (here is a good blog post I read) and there are ways to fix it but I reckon it will take a bit of testing and so I have taken the plunge and I am going to buy a Dell laptop so that I can see what things are like from both sides and also coz I want a laptop.

Its 2010 now, I really do think I should purchase a new computer  😀

Using Drupal Image Module with Lightbox2

March 6, 2010

Well if you have read my other post on making an image gallery (example here) you will know that I used the module called ‘ImageCache’ and not the module called ‘Image’.

The reason I did this was because I read a tutorial on that and I just did what it said. I saw the image gallery that had been created and I wanted mine to look like that.

At the time I didn’t realise how easy it would be to make a gallery that still looked like that but with the image module, which already has galleries built in that use taxonomy and are just really easy to use and great! And most importantly they already have the node set up called ‘image’ so its one less thing to do. Always good.

So….  I have just set up 4 different galleries using the image module and lightbox2 and views. Take a look at them here and then read below for how I did it…

You will need the image module and the views module.

1 – Choose Gallery Names (Which will become taxonomy terms)

These names are important as they will appear at the top of the gallery and in any links to the gallery. These names are actually part of the taxonomy.

Now if you don’t know what taxonomy is then I will try to explain. Its just like a way of classifying things. So you make a ‘vocabulary’ which is a set of words or phrases, that is used to classify a certain set of things. So in the example of my 4 image galleries. I have a vocabulary for ‘image galleries’ and I have got 4 ‘terms’ which are also the titles of the image galleries. This can be viewed at admin/content/taxonomy but was actually created at admin/content/image just by adding Gallery Names. SIMPLE

2 – Upload Images – tagging each as one of the taxonomy terms

Upload the images in the usual way – node/add/image, and choose the taxonomy term in the pull down menu (that will appear because you have created the terms by naming the image galleries) Now you have the basis of your image galleries right there already because the images will have sorted themselves into the correct gallery.

3 – Customise your Galleries Using the ‘Views’ Module

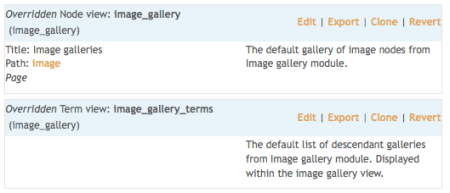
If you want the image galleries to use Lightbox 2 then all you have to do is to configure the views. Here is a screenshot to show the two views that you will have to modify. The top one is for the galleries themselves and the bottom one is for the base gallery page (which links to all the galleries). These are created by the image module, so once again – SIMPLE

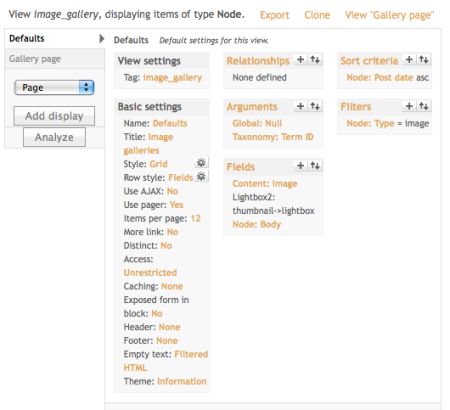
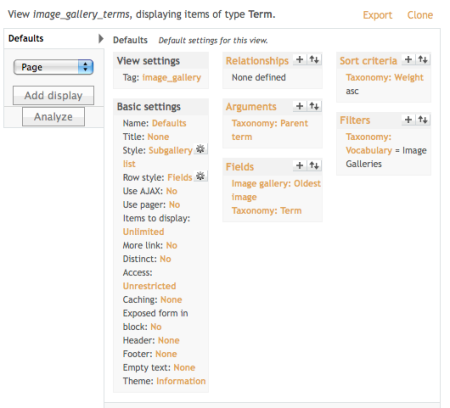
And now here are two screenshots to show how these should be configured to get the galleries to have thumbnails and then lightbox when the images are clicked on.

This is for the image galleries, as you can see the important bit is ‘fields’ (where we enter thumbnail to lightbox – (ignore ‘node: body’ as I just used this so I could also display text with my images) and ‘arguments’ (where we enter taxonomy: term ID)

I have my galleries in a grid style with three columns, sorted by date.

This one is for the parent page of all the galleries and the important parts of this one are ‘Fields’ (where we add taxonomy:term) and ‘Arguments’ (where we add taxonomy: parent term) and also ‘Filters’ (where we add Taxonomy: vocabulary)

By doing this we get a page which is like the home page for the galleries.

So as you can see it really is very simple to use the image gallery module and its fully customiseable. I will do image galleries like this from now on. Mainly because I had a LOT of problems when I created a new node called image as image module creates that automatically and then I had a whole load of confusion going on when I didn’t know which node was which and neither did drupal. This way is well easier!


Error Message – Could not connect to MySQL database

February 17, 2010

OMG I have just had THE most stressful 3 hours EVER!

Well maybe…

Anyway what has been happening is that I have been getting an error message everytime I try to open up MAMP.

“Error: Could not connect to MySQL Database”

This pops up in Firefox as Mamp opens. So basically I could still work on the website, but this error message came up when I tried to get to the MAMP start page. And I have been having a few problems with the website so I thought that fixing this might solve my problems (I hope so but still to see about this!)

So anyways…

I looked and looked and looked for an answer and found that many people do many different things.

My Solution –

So what I did may not help you as you may have a different problem, BUT…..

What I did in the end was that I went into /Applications/MAMP/bin/Mamp/index.php and I changed line 15, where it says ‘root’ ‘root’ – I changed these to my ‘username’ and then my ‘password’ (The ones that I chose when I first set up MAMP)

I next went into /Applications/MAMP/bin/phpMyAdmin/config.inc.php and changed lines 85 and 86 to my username and password.

Then I saved and closed these files and I quit MAMP and re-started and IT WORKED!!!  I am so so so so sooooo excited!!

Computers are so great sometimes. I think the fact that they often don’t do what I want them to makes it so much more satisfing when they eventually do. I feel like I have really conquered something HUGE!

Ah – so now onto my next problems….

My Problems Setting Up Multisite on MAMP

February 16, 2010

My word – STRESS!

So I have just set up my computer so that I can have another site working with my MAMP application. So that means that I can now work on two sites at home and not have them online.

It was really not very easy to set up but its such a simple thing that it should have been I think.

Apparently MAMP Pro takes away all the problems as it you can have an unlimited number of virtual hosts and its all configured like that ready to go, but you have to pay for this and I wanted to see if I could do it for free first coz I am cheap!

Now the reason I want to be able to have these two sites on my own computer is that I am going to start working on my parents site now. Yay!  So I want to be able to do this offline so that there can be no problems that anyone knows about and then when it is perfect I will upload it to the internet and all will be well.

STEP ONE – Export Database.

So the first thing that I did was I went into the cpanel for their website and I exported the database as a file that I was later to import into MAMP. This was the same thing that I did when taking my other site from MAMP to the internet, just the other way around.

STEP TWO – Make a new file in the etc/hosts folder. (I don’t know what this means by the way!)

Then I read these instructions (from the drupal.org site) and I could not understand what to do coz I didn’t know how to change the file. But maybe if you have more knowledge than me it would be easy.

For me tho my answer was to be found here, at a blog post I read.

The instructions were really scary to follow and involve going into the Terminal Application! At the point where they ask for the password it has some text where it says that you might delete everything just by being in there. OMG

But… I did what it said. I made a new location with a new name. I called it todtaylor coz tats the name of my parents website.

(I am not sure about the .drupal.local bit in the other instructions by the way – although in other ways the two posts seem the same)

STEP THREE – Add database

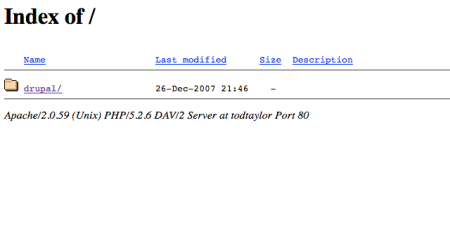
So at this point I went to http://todtaylor it came up with a page like this

When I clicked on ‘drupal’ it went to the drupal start up page and I added in that database that I had exported earlier.

It was quite hard.  I didn’t know what to put for the password but in the end what I did was I went into the original database in MAMP and I went into priveledges and changed the password and it told me the password had been changed for root@todtaylor so I knew the username was route.

So it all seems fine now but I am still a bit scared. Also the version used for the site was Drupal 5 and on my computer I have Drupal 6 so its all a bit wrong right now.

As they say tho – It will all be alright in the end and if it isn’t alright then it isn’t the end. And this is NOT the end, so its sweet  🙂

Why Can’t I Browse For Images with WSIWIG Editor?

February 10, 2010

I have been having an extremely frustrating problem. The reason it is most frustrating is because it is the second time I am having this problem!  I have already had it, solved it and then forgotten about it and now I am having it again!

This is the reason I started to write this blog – because there has to be somewhere for me to store my solutions so that I may refer back to them next time I need them. There is ALWAYS a next time! Especially with a memory like mine.

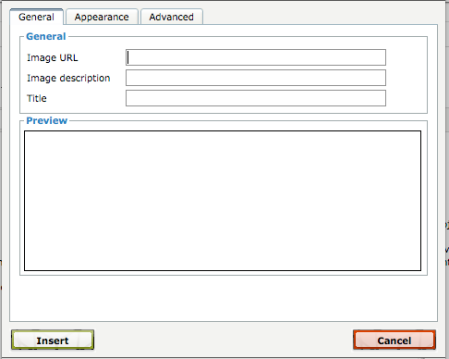
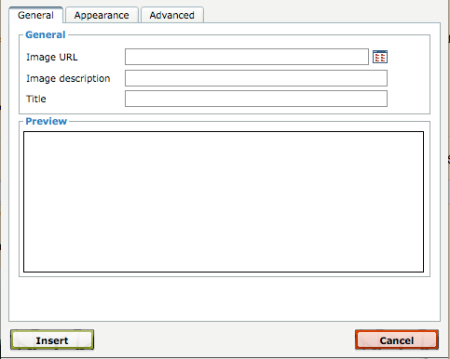
So my problem is that when I am using the WSISIG editor inside some content, like the blog or a page, I cannot get the ‘insert image’ to show a browse button.  I shall demonstrate with screenshots…

See here is what I get…

…and this is what I want.

Now the solution – as I have just re-remembered, is very simple and is explained here on this blog.

Basically it all centers around the module called IMCE Bridge, which I have installed on my website but was not installed for my parents site.

So what you have to do is make sure that you have downloaded and installed the IMCE Bridge module in the usual way (that is to put it in the modules folder where all the other modules are) and then go to admin/build/modules and tick IMCE Wsiwig API Bridge module so that it is turned on. The next thing to do is to go to admin/users/permissions and make sure that users are able to attach images (if you are allowing others apart from yourself to write a blog for example) Now go to admin/settings/wsiwig and edit the full html input format. Go into buttons and plugins and make sure that both image and IMCE are ticked.  Now you should have a browse button in the image attach.  Yay.

I am now working on my parents site and have just managed to get MAMP to work for two websites so will do a blog post about that soon.

Ubercart NZ Bank Transfer at Checkout

February 5, 2010

Here in New Zealand paying by bank transfer is totally normal. Its what we do. I dunno what its like over the rest of the world but here almost anything can be paid for with bank transfer and its great coz it means you don’t have to have a credit card to buy online.

I wanted to have this on my website but it wasn’t in the modules that come with Ubercart so I had to go looking for it.

Once I again I found my answer in the Ubercart forums. That place is great!

I downloaded another module from drupal.org called Bank Transfer Ubercart Payment. There is a ‘Read Me’ which explains what to do to get it to work. It looks a bit confusing but if you read it slowly line by line and don’t move to the next line till you have done what the previous line asks then it shouldn’t be too bad.

All it does is add the option to pay by bank transfer and then adds an action where an invoice will be sent out with bank details on it.

When you see the money come into your bank account you can then go into Store Administration and into Orders and look at the order. You will see that the order is still awaiting payment coz no one has recorded a payment. What I do next is to manually record that the payment has been received and then deal with the order in the normal way.  Well.. I would if I had needed to yet but no one has used it  😦

Anyways its pretty cool.

Drupal & Ubercart Flat Rate Shipping – Problems and Solutions

February 4, 2010

22 Jan 2011 – just adding a couple of corrrections to this post

One of the biggest problems I have had with Ubercart has been to get a flat rate shipping cost that is added automatically to every order and that does not change whether 1 or 2 items are ordered.

(hmmmm, note to self – should I have it set so it increases after 2 items, so that the postage is higher for 3 or more items? – one for another day!)

What I wanted was a $6 postage charge to be added at the checkout. No shipping calculations and no problems if anyone forgets to click the button coz after all, if the postage is always a flat rate of $6 then there is no need to click the ‘calculate postage’ button.

My answer was very simple in the end but it took me ages to find it.

Here are the steps to go through –

Add your flat rate
Add a flat rate shipping method here admin/store/settings/quotes/methods/flatrate. I gave mine the title of New Zealand (this is what I see) and then the line item label of NZ flat rate (this is what people see at the checkout and means that later I should be able to add a rate for other countries too – but one thing at a time!)

I gave mine a base price and default shipping rate of $6. (By the way I went to the post shop first and checked how much it would be to send a t-shirt within New Zealand and there is a pre-paid envelope that would actually take 2 t-shirts and its the same price no matter what the weight is.  Thats why I want a flat rate.)

Correction – only give a value to the base price and NOT default shipping rate if you want the flat rate to be one price for every order, no matter how many items. The base price is the shipping rate and the default shipping rate is an extra which is added on for each additional item. This can be overriden in the product settings as shown below. But if you do it correctly here then there is no need!

Check all configurations in the store
The next thing to do is to make sure that all the correct permissions are enabled and that the shipping quote module is correctly configured.

I will explain what I did, and in italics is how to get there, ie for me I put http://www.hardluck.co.nz/admin/store/etc…..

admin/store/settings/cart – make sure shipping quote is enabled in ‘cart panes’ in edit

admin/store/settings/checkout – make sure calculate shipping costs is enabled in ‘checkout panes’ in edit

admin/store/settings/orders – make sure that shipping quote is ticked in ‘order panes’ in edit

admin/store/settings/cart/quotes/edit – tick the box for ‘prevent the customer from completing an order if the shipping quote is not selected’

admin/store/products – go into each product and scroll down to shipping settings, in here there is a box to enter the flat shipping rate to over-ride the default. We don’t want to do that BUT it says (in my one anyway) ‘Enter -1 to revert to the default value’

This is not right. When I entered ‘-1’ it just took $1 off every time I calculated shipping!  So in there I now enter ‘$0’ and it works fine.

This is no longer necessary

Get the shipping rate to calculate automatically
There is a wee piece of java script here that some amazing person has written, which when downloaded and saved into sites/all/modules (by uploading it with your FTP client – like Filezilla) will make sure the shipping costs button is pressed automatically. I found it by searching thru the Ubercart forums which is a really good place to look if you are having problems coz there are bound to be other people who have the same ones!

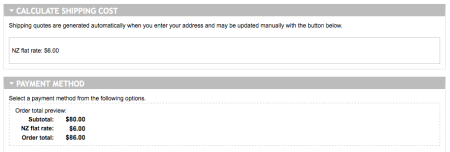
So here is a screenshot of part of my checkout and this was just after I added the address. I didn’t need to do anymore, its just added shipping on itself.
Test it thoroughly and have someone else test it too!
This is like THE MOST important step of all! I had my site offline for maintenance when I did this work to it and I tested it a few times myself offline. I then put it online and got my mum to test it too because if there is something that will go wrong she will find it!  I dunno how she does it but she can get even the simplest things wrong so I get her to check everything knowing that if she can work it then it must be ok.

I just thought tho that while it was online and she was testing then then theoretically someone else could have been on there too. I did have it checked by myself by that point and didn’t expect any visitors but I guess that could be a problem for some people. I wonder what other people do in this situation?  Do they work with their site offline?

The next thing I need to do is get my computer sorted so I can work with more than one offline site.